27 September 2013

50mm Lens to Macro in 10 Steps


1. Find a subject in good light, preferably a subject that would be interesting up close and isn't moving. Hello pineapple!


2. In manual or aperture priority mode, set your aperture in the f/5.6-10 range.  Then set your shutter speed (at least 1/125 seconds) and ISO to achieve correct exposure. 

Need help? How to Shoot in Manual Mode- The Basics!

3. With the camera still on and set to exposure settings, place on a flat surface with the lens facing up.


4. Find the depth of field (dof) preview button and press it down. You will see your lens stop down to your set aperture.


5. While pressing down the depth of field preview button, use your other hand to press the lens detach button and twist the lens off. This took me some practice! 

Here's how I do it, right hand pointer finger pressing and holding dof preview button. Left hand comes up over the top of the lens, the side of my left middle finger pressing the lens detach button while my left thumb and pointer finger grip and twist off the lens. 

(You won't be photographing yourself as you do this, so use both hands and put the first two pictures together.)

6. Take off your lens very carefully. (If you did this correctly you will see your lens stopped down).


7. Flip the lens around and place it on the opening of the camera.


8. Now you are ready to shoot! Carefully pick up your camera body with one hand and your lens with the other. Remember, you just spent the last few minutes getting them separated!

9. Hold your camera to your face and the lens to the camera and move close to your subject until it is in focus. Don't be surprised when you have to get REALLY close! 

Take a first shot to check the exposure and focus. If the image is underexposed try a slower shutter speed or bump up the ISO. Because your lens isn't mounted to the camera body, light can leak in and cause overexposure (bad) or artistic flair (good). If this happens, just adjust the lens to cover the camera sensor and keep shooting.

10. Shoot, shoot, shoot! This may not be easy in the beginning but I promise it will get better and you will love the artistic images you will create. 

And believe me, it can be addicting, use with caution.

Happy Shooting! And please feel free to send me your questions or macro images!

26 September 2013

365: Cheerios and Childhood


Not a surprise, but the first word out of J's mouth each morning is the one thing most pressing on his mind. Sometimes he says thought provoking and intriguing ideas. 

But usually he just screams, "CEREAL!" (or, "TRUCKS!")

This boy is an eating machine. It isn't uncommon for him to eat more than I do at breakfast. And where does all this food go, you ask? It must be going to brain power to say words like bulldozer and ambulance because we all know he continues to stay in the 8% percentile for weight. 

Oh well. With two tall skinny parents what more could we want?

Last night at dinner he saw the cheese and held it up to his face and said over and over, "Oh cheese! Oh cheese!" This morning it was, "Oh cereal! OH cereal!" (Said with a voice filled with awe and adoration.)

I sure hope Joseph and I don't talk to our food like that. Hm, maybe to each other but certainly not to our Cheerios.

23 September 2013

Garlic Herb Challah Bread

Ever since my photography homework where I used peaches as subjects, I have been a little obsessed with food photography. And by a little I mean a lot. In fact, the little guy feels so neglected that when I was photographing this recipe he was calling out, "cheese, cheeeeese!" trying to get my attention.

But as I have been exploring this new found passion a hard reality has hit me. I'm not particularly good at cooking or baking. Opposite of most bloggers that start with a passion for food and then photography follows, my passion for photography is making encouraging me to learn a few things in the kitchen. (My husband will be happy!)

As I was perusing cookbooks this week, looking for something easy to try that would make a great photographic subject, I came across a bread recipe that caught my eye. 

This was a very brave undertaking for me because a) proofing yeast terrifies me, b) kneading bread (and always forgetting to take off my wedding ring) terrifies me, and c) I always get flour everywhere, always!

With that detailed foreword, let's get on to the recipe! And please keep in mind, I am a photographer first and a beginner bread maker second.


Garlic Herb Challah Bread
Adapted from: Better Homes and Gardens
Yield: 3 loaves 

1 3/4 cups warm water (105°F to 115°F)
1/4 cup honey
2 packages active dry yeast
4 eggs, lightly beaten
1/2 cup olive oil
1 Tablespoon salt
5 cloves garlic, minced, divided
2 teaspoons dried basil, crushed, divided
2 teaspoons dried rosemary, crushed, divided
2 teaspoons dried thyme, crushed, divided
8 to 8 1/2 cups all-purpose flour
3 Tablespoons butter, melted

Directions-
1. With a wooden spoon, mix the warm water, honey, and packages of yeast in a large bowl. Allow the yeast mixture to proof for 10 minutes or until foamy.


2. Lightly beat the eggs in a small bowl and set aside. When the yeast mixture is ready, add beaten eggs, olive oil, salt, 4 cloves minced garlic, and 1 teaspoon each of dried basil, rosemary, and thyme.


3. Progressively add and stir in as much of the flour as you can. (The dough will pull away from the sides of the bowl and look ropey.)

4. Lightly flour your work surface and plop (yes, plop) your dough out of the bowl. Begin kneading in enough of the remaining flour to make a soft dough that is smooth and elastic. (About 5 to 7 minutes.)


5. Lightly grease a large glass bowl with olive oil. Shape the kneaded dough into a ball and place in bowl. Turn once to lightly cover dough with oil. Cover with a clean towel and let rise in a warm place until double in size (1 to 1 1/2 hours).

6. After 1 to 1 1/2 hours, check dough for readiness by pressing two fingers 1/2 inch into the center. If the indentations stay, punch your fist into the center of the dough until the edges pull in. If the dough is not ready, allow dough to continue rising.


7. Plop dough again onto your lightly floured surface and divide dough into three equal portions. Then divide those portions into three equal parts so you have nine total.

8. Roll each portion into a 24-inch-long rope. Take three ropes and lay them side by side and begin braiding. Repeat braiding three ropes at a time until you have three dough braids. Twist braids into three spiral loaves or leave flat to make long loaves. 


9. Spray three baking sheets with non-stick spray and allow each dough braid to rise on pans, covered in a warm place for about 30 minutes or until doubled.

10. Preheat oven to 350°F. Meanwhile, melt 3 Tablespoons butter in a small bowl. Then stir in 1 clove minced garlic, and 1 teaspoon each of dried basil, rosemary, and thyme. Brush butter herb mixture over each loaf.


11. Bake for 30 to 35 minutes or until loaves sound hollow when lightly tapped. Immediately remove loaves from baking sheets onto wire racks to cool.

Notes-
-Don't make my mistake and think you can start this recipe at 3:30pm and have it ready for dinner, especially if you are making it for the first time and taking photographs as you go.
-This bread is SO good right out of the oven, but if you don't eat all three loaves right away, they can be frozen.
-Nutritional information can be found here.


19 September 2013

Photography Didn't Ruin my Life

Recently I stumbled upon Courtney's blog post, How Photography Ruined my Life, over at Click It Up A Notch. (Notice all the links? Yes, they mean to need to take action  and let her teach you about photography!)

Now when I started reading I thought she would say, "just kidding, photography is awesome, DUH!" 

But as I read, she did not take back her words and as I continued I realized that photography has ruined my life as well. Bummer.

I realized that I too use to be able to just enjoy photographs for the people included, the memories they held, and the feelings they inspired. Now as my knowledge and eye for photography has increased, so has my criticism. I see blurry. I see weird colors. I see crooked horizons.

Maybe it is the optimist in me, but I began to make a list of the ways that my love for photography has improved and enriched my life.

Proof that photography didn't (completely) ruin my life :

1. I've come to accept recently that I am a home-body. I am a happy girl at home as long as I make it to the library at least once a week. (Opposite of my boys, they need adventure and fresh air!)

Being a photographer has forced me to go outside my little bubble and explore the world. Because I do not want 365 pictures of the inside of my house when I am finished with my project, I enjoy the challenge to find fun and beautiful places to visit with my family.

  
When my husband wants to get me somewhere, he just has to say, "You can take pictures...." and I am out the door ready to make memories and photographs along the way! 


2. Being a photographer, I look at messes (big and small) as a photo opportunity. Before I can think about the damage and the time the mess will take to clean up, I am running for my camera and thinking of my beginning camera settings. 


Then I go into my mode, taking pictures of the culprit and his disaster. I've found that after I have gotten images I am happy with, the mess and all the chaos is so much easier to deal with. This makes for a happier, less-stressed, and calmer mom.

eating eyeshadow! sparkly and delicious!
"Yes there is (insert disaster here) but at least I can blog about it!"

3.Being a photographer, I am able to remember and enjoy my memories with my family so much more because I have tons of pictures!

Sure we don't have many posed family pictures, but I have captured all of the moments that define our little family. Now I appreciate all of the small and beautiful things that I do have instead of focusing on the things I am lacking.


These photographs prove to me that I lead a happy and very blessed life. 

And that makes me very happy.

And when I am so happy, it is easy to forget that photography ruined my life in the first place.

18 September 2013

365: This Little Boy


Well I don't know how it happened. And I don't have any decent excuses as to why I missed it. 

All of a sudden there is a little boy sleeping in the crib that use to be for my baby. 

This little boy doesn't cry when we lay him in bed like the baby would, instead he calls out, "Bye trucks! Bye bye planes!" And then he sings himself to sleep.


Now instead of signing "more" in baby sign language, this little boy throws himself on the ground repeating, "down down down" in case we didn't see that he is throwing a tantrum to get what he wants.

More importantly, this little boy says, "tinkyou" and "mom" which are the best words ever. (!!)

He is also under the impression that "please" is best used when strung out for several seconds and uttered very close (read: touching) mom's face.


This little boy still loves books and after reading with Daddy, he always impresses me with his new vocabulary. This week he has been telling me all about the planes with engines and wings and the airport.


This little boy loves all things that move and uses his imagination in his play. He likes to tear his toast into pieces and drive them across the table making car noises and crashing them into one another.


It is hard to believe that this little boy is growing and learning so fast. Didn't he just turn one like...yesterday?

16 September 2013

Crockpot Vegetarian Fajitas

**Update** I just made this recipe as a freezer to crockpot meal in preparation for the birth of our baby girl and it turned out fantastic! 

When making this recipe for dinner one night I just doubled the recipe and threw half the ingredients in the crockpot for dinner and the other half in a freezer safe zip top bag. To use, thaw in the fridge for 24 hours. Dump into crockpot and cook according to the recipe. 

We noticed two differences with the frozen versus fresh version of this recipe. First, the finished frozen recipe had so much more flavor than the fresh version. Second, the frozen recipe has much more liquid so I suggest draining after cooking but prior to serving. Enjoy!
 

I love trying new (pinterest!) recipes. 
I love proven family recipes that never fail. 
I love checking out stacks of cookbooks from the library just to spend evenings pouring (and drooling) over the pages.

Yep, it is safe to say that I love food and I'm starting enjoy the making of the food just as much as the eating. Ha. Almost.

I've learned that there are people/blogs I can trust for recipes, and others that I cannot. All it takes is a few pinterest recipes that look so good online but look so... not on your plate before you become a little cautious.

One group that has recently joined my trust list, are the girls over at Six Sisters' Stuff. I made their Easy No Bake Peanut Butter Bars and thought I had just been given the secret recipe to making a Reese's Peanut Butter Cup. No lie. It was amazing!

Well these girls surely delivered when I was looking for a fast and easy way to do fajitas at home. These Slow Cooker Chicken Fajitas were everything I was hoping for and more! 
 

After making this recipe a few times I have tweaked it each time to meet our tastes and to use items on hand. Here is our version!

Crockpot Vegetarian Fajitas
Yield: 8 fajitas 

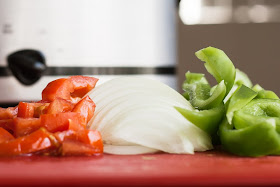
3 roma tomatoes, diced
4 ounce can diced green chilies 

1 large green bell pepper, seeded and sliced
1 large red bell pepper, seeded and sliced
1 medium onion, sliced
1 1/2 Tablespoon vegetable oil 
2 teaspoons cumin
2 teaspoons chili powder  
1/2 teaspoon dried oregano
1/4 teaspoon garlic salt

Directions-
1. Spray crockpot with a thin coating of non-stick spray.

2. Add all of the above ingredients to the crockpot and mix with a large spoon until all vegetables are coated with oil and spices.

3. Cook for 4-6 hours or LOW or 2 hours on HIGH.

4. Serve with warmed tortillas, black beans, avocado, and sour cream.  

Notes-
-Nutritional information found here.

-I used one frozen bell pepper that I had sliced and frozen previously in the season, and one fresh pepper. Both turned out equally yummy in the final dish.

-The recipe for black beans was spread down the center of each tortilla, with the fajita mixture on top. This made the vegetarian dish much more filling.

-If you insist on meat: add 1 pound boneless, skinless chicken breasts, cut into 1/2 inch strips when adding the vegetables.

13 September 2013

365: Red Shoes


I love picking up my camera to capture just one photograph of our day. 

I don't usually start the morning with my 365 project on my mind. But because I have my camera sitting on the kitchen counter, in the center of the house, I see it often and remember to use it.

This day, J found a pair of my red flats in the closet and was trying them on. I didn't take notice until he walked over by the sliding glass door. The light coming through the sliding glass door was just too perfect for me to resist. 

And obviously this was after lunch and after someone made a mess of his shirt. Hm. I'm guessing jam was the culprit.


11 September 2013

Homework Reflections

Yesterday I was working with peaches and pluots for a set up in my mini-studio (aka kitchen table by the window) for my next photo project. I'm currently on Unit 3 which is all about different kinds of lighting and how to use them most effectively. This photo project focused on the use of a reflector as a second light source.

Prompt: Set up a simple group of objects, such as a bowl of fruit or a vase of flowers. Put your camera on a tripod. Your light (sunlight, window light, or a light from an incandescent bulb) should come from about 45 degrees to one side. Turn off all other lights. Do not use flash.

Take the first picture.

Do not change anything. Do not move the camera, the subject, or the main source of light. Do not change the aperture, shutter speed, or focal length. Place a reflector (in my case, a large piece of white cardboard) on the side opposite the light source. Move the reflector closer and farther from the subjects until you are satisfied with the way it lightens the shadows.

Take the second picture.
Straight Out Of Camera (SOOC)
It was so simple to bounce the light onto the other side of the bowl to fill in all shadows. And yes, you can use post-processing to lighten the shadows but getting the photo you want in camera and saving yourself editing time is so. much. better! This simple exercise is easy to do and a great lesson in manipulating light.

Who knew food could be so beautiful? I fell in love with the contrasting color of the red/orange fruit with the blue bowl.  I've decided that food photography is fun (and tasty) so I will be attempting more in the future.

An excuse to make new recipes from my pinterest board AND practice my food photography?? Yep, that sounds like the best (tasting) idea ever.